Tuesday, June 25, 2019

easy cheesy snackers


Crunchy snacks that are low carb are pretty much non-existent.

Sure, veggies are crunchy but they just aren't satisfying if one is craving chips.  Pork rinds are usually zero carbs but gosh...it's the fat off a hog!

I saw this idea on Pinterest.  You can use a hard cheese, like Parmesan, Asiago, or Romano, to make a crunchy, crackery type snack.

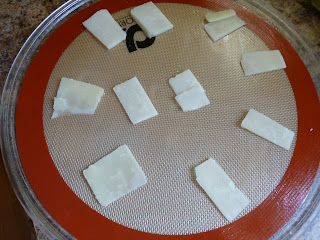
All you have to do is thinly slice the cheese into cracker sized pieces...


Arrange them on a silicone mat...


And microwave them 45 - 60 seconds, depending on your microwave and how thin you've sliced the cheese. Cool on the mat and you are done!


The original instructions said to shred the cheese and arrange by spoonfuls.   
I found that this results in spreading and very thin fragile snacks.

 Using slices keeps them slightly chewy. Good for topping a salad,eating alone or with a dip or spread...like this Philadelphia Smoked Salmon spread.


They are very rich so just a few can curb a craving.  I have stored the extras in the fridge but they tend to get softer and chewier.


Wednesday, June 19, 2019

starting another quilt

Someone said the hardest part of any project is getting started.  That certainly has been the case for me with this quilt I am making from a book I bought at the quilt show a few weeks ago.

I was disappointed when I looked at the pattern directions a few days after I got home.


The whole quilt was to be made using small triangles... arranged in vertical rows and sewn together as you see in the picture below.
That made no sense to me. It seemed like larger sections of each color could be used, but I couldn't figure out how to sew them together since they are all interlocking and crossing.


I searched the internet for different methods and finally I found the blog of a lady making a quilt with a pattern very much like this one.  In her photos of working on the blocks, I saw that she was building triangles - not squares or strips!

With this bit of insight I thought I could try drawing my own pattern for the quilt in the book.

I had to order a 60 degree triangle ruler (equilateral?) and when that arrived I began working with cardboard to figure out what sizes I needed to use before cutting fabric.

I started with the size of triangles used in the book pattern, that was my center triangle. Then I worked out how big to make the three strips surrounding it.


I made a practice block with some old cheapy fabric. It came out with ripples so I could see that I needed to trim up my angle after adding each strip.


I was ready to cut fabric and start making blocks.  Here is the first one. 
In this photo, I drew around this particular triangle in the book so you can see how it fits in the quilt.


There are 8 different triangles in the quilt. All with different color arrangements. Some face left and some face right.

At first I will make 12 of each color and assemble them together in columns. Then I will have to put my thinking cap back on and work out how those edges and top and bottom are done.

This will be a fun and different type of quilt.  I hope the fabrics I've picked out look as cute as the example in the book!


Thursday, June 13, 2019

Project Appleseed

Months ago, when we were sitting around after a family dinner, the Sasquatch mentioned a target shooting event he was thinking of participating in, called Project Appleseed.

They were having a half price special on tickets for the two day event and there was a time limit on getting the deal.  The Sasquatch said to me..."You ought to try it".

Well, I have done okay when we target shoot in the back yard, and it sounded like it might be something fun and different to do, and I had to decide before the half price special ended, so I said "Okay".

We signed up for the June session, at Knob Creek Gun Range. In the weeks leading up to the event, the Sasquatch started telling me more about it.
Well, you shoot from 3 different positions...standing, sitting on the ground and laying down on your stomach!  Oh, lordy mercy!

About a week before the event the Sasquatch got permission to use the lower range where it is held, so we could practice there.


He had bought some special shooting mats for us to use when sitting or laying down (prone position) to shoot, and he'd printed off some targets like the ones they use at the event.
We tried shooting in all the positions and practiced for the parts that would be timed.
It was fun.

Then the date arrived for Day One.  It poured down raining so fortunately we were under a roof.
After everyone was registered it was time for a history lesson.  All about Paul Revere and the battles of Lexington and Concord.  There were more history lessons and stories during lunch and breaks both days.


Afterwards we hung our targets and did some warm up practice shooting.
Next, we were instructed to disconnect our slings from the back of our rifle and form the loose end into a loop. This loop had to be worn above our left bicep when shooting.


Next, one of the instructors demonstrated proper form for each shooting position in turn, and we would try shooting in each position afterwards. Then we worked on "natural point of aim" which involved focusing on your target, then closing your eyes for a few seconds then opening them to see if you were still focused at the same spot.  


It was a lot of getting up and down because we had to get in our position on the ground, focus on the target, then stand back up and wait for the order to get back down in position to "Fire".
All this with the rifle staying looped on your arm and making sure to always keep it pointed down range.
I kept forgetting things...like putting on my ear protection or pulling back the slide after loading a new magazine.  I lost all concentration and I will even admit that during the day, I accidentally focused and shot at the targets belonging to people both to the left and to the right of me.


Toward the end of the first day, we put up the actual targets that would be scored for the "Appleseed Qualification Test".  During that test there are lots of instructions about how many rounds to load, which area of the target to shoot and in what order, when to change magazines, and how much time would be allowed for each phase. We shot standing, sitting and prone.

I was exhausted by that time and did horribly, but I didn't care. I just wanted it  to be over!

On the other hand, the Sasquatch did really good and scored enough to get his "Expert Rifleman" qualification.

That gets you bragging rights, admiration from the other shooters, and a nice patch.


At home that night, I made the decision not to shoot the next day.  But I did want to go and watch.  The instructors were ready with some ideas about letting me use a sandbag support for my rifle barrel or letting me avoid some of the getting up and down.  But I didn't want any special treatment.  I just wanted to sit there and sip my McDonalds coffee and watch the shooting.


The Sasquatch scored well enough on another test to again qualify for the Expert Rifleman status...but you only get one patch per event.

We both got a tee shirt - included in the fee.


The Sasquatch really enjoyed the event and plans to do it again.

I am glad for the experience...glad I tried.

I can say "Been There, Done That (poorly), and Got The Tee Shirt".

Friday, June 7, 2019

cutting fabric for a quilt

We have had workmen here doing an outside project.

It's always hard for me to go about my business when people are around working.  I feel compelled to keep looking out to be sure they aren't cutting down trees or drilling holes somewhere I don't want them to.
And I just want to be available if they come to the door with questions or problems.

I have found the best thing I can do to be productive while they're here, is to stand at the kitchen peninsula and cut out fabric for a quilt.
It is also very calming!

This is actually another kit that I bought on clearance from Connecting Threads years ago.
Let's see...the fabric is dated 2012.   I'd say it's time to get started on it!


I did get all the pieces cut out.  I really like the fabrics and I wonder why I didn't work on this sooner.


There was something a little unusual about the cutting instructions for this one.
This striped fabric is used by cutting it in sections.  You can see above...the green stripes are used and also the leafy sections.  The black sections are left over for another quilt...or maybe I will figure out how to use them on the back.


So, now I have this packed in a project box and it's ready for sewing.  
It won't be my next project though. I am making a quilt for a gift and I'm supposed to be finishing up things I've already started on!